
How to Read Architectural Blueprints A Practical Guide
- Feb 5
- 13 min read
Updated: Feb 23
Before you get lost in the sea of lines, dimensions, and symbols on a set of architectural plans, there’s one place you absolutely have to start: the title block. Think of it as the command center for the entire project.
Getting this part right from the get-go is the secret to preventing a world of headaches and costly mistakes down the line. It ensures you—and everyone else on the project—are working from the same script.
Your First Stop: The Blueprint Title Block

On any given sheet, your eyes should immediately go to the bottom right-hand corner. That's where you'll find the title block, a neat, organized box packed with the project's vital statistics. It's the blueprint's birth certificate, telling you everything you need to know before you even look at a floor plan.
This block lays the foundation. It tells you exactly what you're looking at, who drew it up, and how current it is. Trying to read a blueprint without checking the title block first is like trying to build a house without knowing the address—you’re just asking for trouble.
Key Information in the Title Block
Once you know what you’re looking for, navigating the title block is simple. Each piece of information has a purpose, and together they give you a complete snapshot of the project. Be on the lookout for these critical details:
Project Name and Location: This clearly identifies the build, like "The Smith Residence," and provides its physical address.
Architect or Firm Name: This tells you who is behind the design, such as our own Stephen Alexander here at RBA Home Plans.
Drawing Scale: This is absolutely non-negotiable for understanding the drawing. A common scale you'll see on residential plans is 1/4" = 1'-0". That just means every quarter-inch on the paper represents one full foot in the real world.
Issue Date: This date indicates when this set of plans was officially issued for construction or review.
Pro Tip: Always, always double-check the issue date against any recent emails or instructions from your builder. Working from an outdated set of plans is a classic mistake that can lead to some seriously expensive fixes on-site.
Don't Skip the Revision History
Maybe the most overlooked—and most critical—part of the title block is the revision schedule. It’s usually a small table that logs every single change made to the plans after they were first issued. Each entry will include a revision number, a brief note about the change (e.g., "Relocated kitchen window"), the date it was made, and the initials of the person who signed off.
It’s completely normal for a home plan to go through 5-10 revisions as details get ironed out. A small tweak, like shifting a window or adjusting a wall, might seem minor, but if the framer is working from an old drawing, that tiny change can throw off the whole build.
By making a habit of checking the revision block, you’re confirming that you have the latest and greatest version in your hands. It's a simple step that lets you build with confidence. For a deeper dive into all the pages that make up a complete set, check out our guide on what architectural drawings include.
Translating Lines into Reality with Scales and Grids
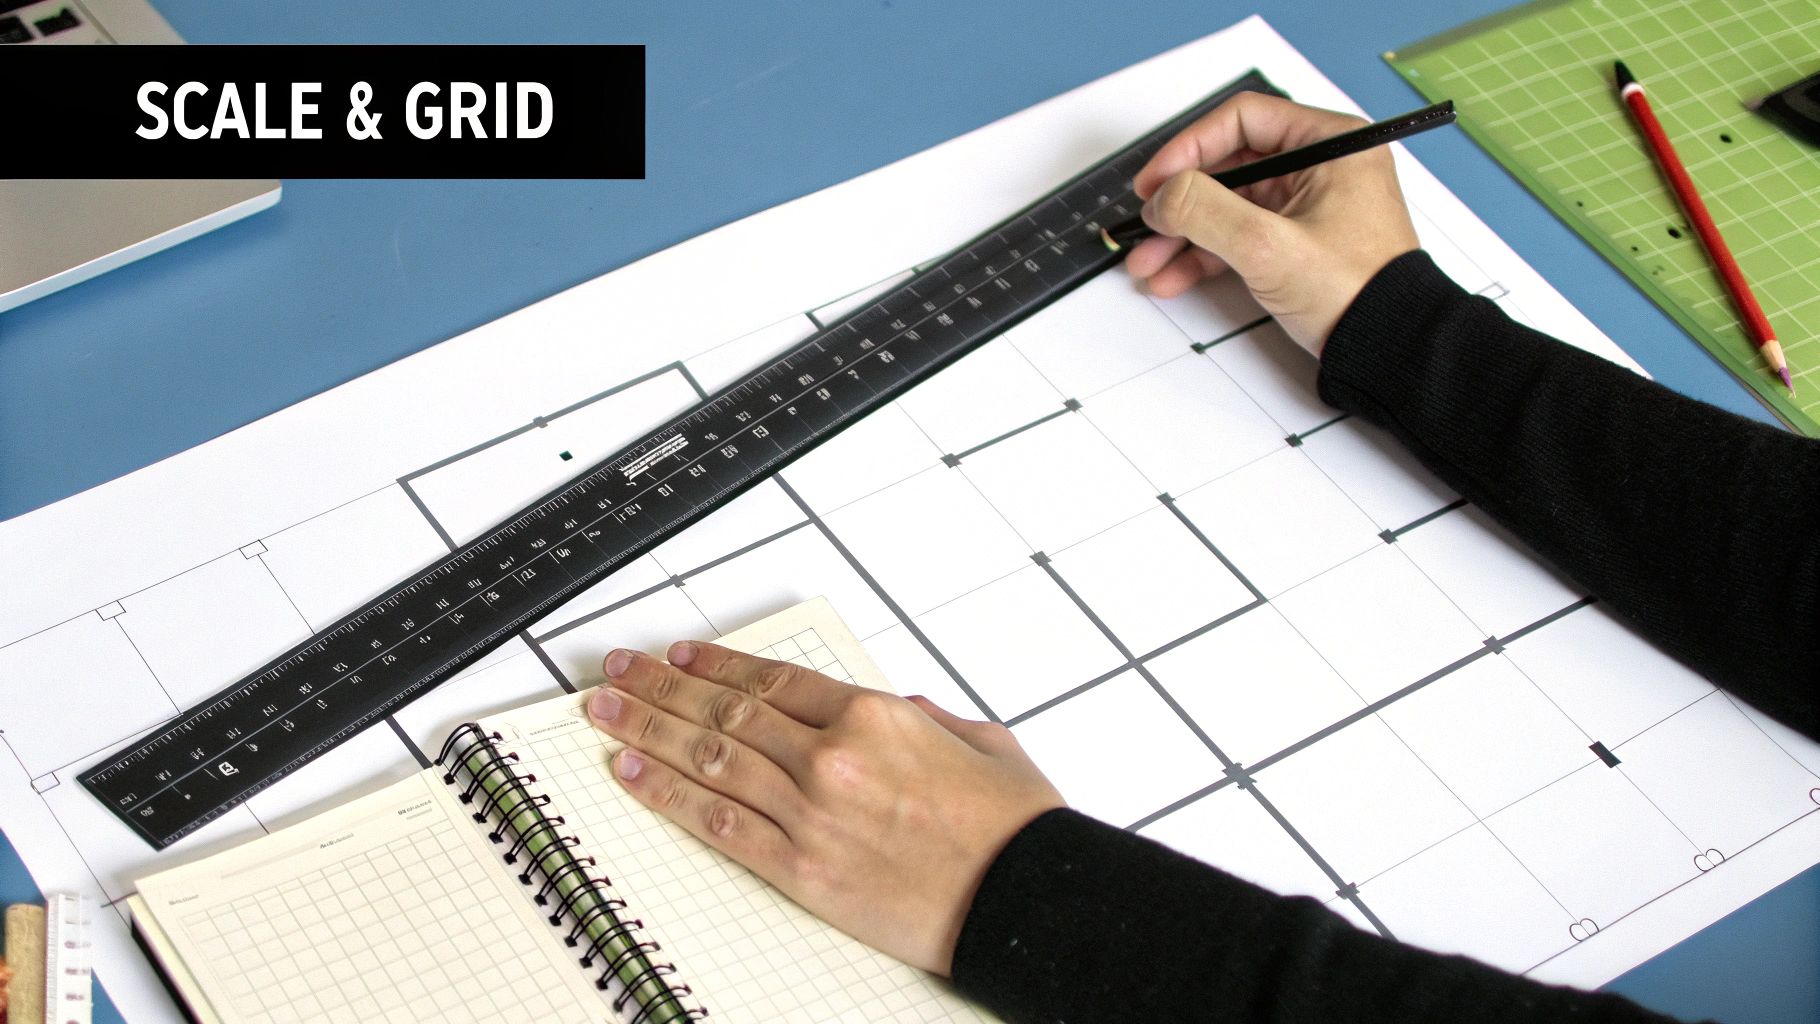
Now that you’ve got your bearings with the title block, it’s time for the magic trick: turning all those lines on the page into the real-world dimensions of your future home. This is where the scale becomes your best friend, ensuring every wall and doorway on paper perfectly matches the final build.
The scale is simply the ratio between the drawing and reality. For most residential plans—like the coastal cottages and modern farmhouses in our collection—you'll almost always find a scale of 1/4" = 1'-0". This means every quarter-inch on the blueprint represents one full foot in the real world. Simple as that.
To use this, you’ll want an architect's scale ruler. It’s a specialized triangular ruler with different scales marked on each edge. Just find the side that matches the scale noted in your title block (likely the 1/4 scale) and you can directly measure anything. Suddenly, a 2.5-inch line on the paper becomes a 10-foot wall in your home.
Mastering the Blueprint Grid System
Most blueprints also use a grid system to keep everyone on the same page. You'll see letters (A, B, C...) running down one side and numbers (1, 2, 3...) across the other. This creates a simple coordinate system, just like a map.
By combining a letter and a number, you can pinpoint any feature with absolute precision. Got a question about the kitchen island? You can tell your builder to "check out grid location C-4."
This little detail is a game-changer. It eliminates vague descriptions like "the post in the middle of the great room" and prevents costly misunderstandings down the road.
Key Takeaway: Grids and scales are your first line of defense against errors. Misreading scales is a surprisingly common problem, contributing to 15-25% of construction defects. Using the grid system to flag questions can help resolve up to 40% more issues before a single nail is hammered. You can learn more about how professionals use these tools from the construction experts at Advanced Building Corporation.
Before we move on, let's break down the common scales you might encounter.
Common Architectural Scales and Their Uses
This table breaks down the most common scales you'll find on residential blueprints and what they are typically used for, helping you quickly identify the level of detail in each drawing.
Scale | Common Use | Example |
|---|---|---|
1/8" = 1'-0" | Site Plans, Overall Building Layout | Showing the entire house on the property lot. |
1/4" = 1'-0" | Floor Plans, Elevations, Sections | The most common scale for residential construction drawings. |
1/2" = 1'-0" | Enlarged Plans, Simple Details | Showing a more detailed layout of a kitchen or bathroom. |
3/4" = 1'-0" | Detailed Interior Elevations | A close-up view of kitchen cabinetry or built-in shelving. |
1-1/2" = 1'-0" | Complex Construction Details | Focusing on specific connections, like how a beam meets a post. |
Understanding these will help you know what level of detail to expect from each sheet in your plan set.
Putting It All Together: Checking Dimensions
Let's try a real-world example. You’re looking at your floor plan and want to make sure your king-sized bed and two nightstands will actually fit in the primary bedroom.
First, find the primary bedroom on the floor plan.
Next, look for the dimension lines that frame the room. You should see measurements written out, like 15'-0" x 14'-6".
Finally, grab your architect's scale ruler, set it to the 1/4" scale, and measure the room's interior walls yourself. Your measurement should match the numbers printed on the plan.
This hands-on check is empowering. It lets you confirm there’s enough clearance around the kitchen island or that your favorite armchair will fit perfectly in the living room. When you master scales and grids, you stop being a spectator and start actively participating in your home's design.
Decoding the Language of Blueprints
Architectural blueprints really do have their own language, a unique visual alphabet of symbols, lines, and abbreviations. Think of this section as your personal translator. We'll demystify the icons that define everything from the swing of a door to the placement of an electrical outlet. At first glance, a floor plan can look like a complex jumble, but trust me, every single mark has a specific meaning.
Learning to speak this language is what separates someone who just sees a floor plan from someone who truly understands their future home. It's how you move beyond just seeing room shapes and start visualizing the functional details that bring a house to life. This is where the layout connects to the systems that make it all work.
Reading Walls and Openings
One of the first things I always tell people to look for on a plan is the different types of walls. Thicker, solid lines usually represent load-bearing walls—this is the structural backbone of the house, and you don't mess with these without an engineer. Thinner or dashed lines typically indicate interior partition walls, which divide spaces and can often be moved during a modification.
Doors and windows also have their own standardized symbols that tell you a surprising amount of information at a glance.
Doors: You'll see an arc showing which way a door swings and how much clearance it needs. A 90° arc is your standard interior door.
Windows: These usually look like breaks in a wall, with thin lines indicating the glass panes. A sliding window might have an arrow showing its direction of movement.
Pocket Doors: A real space-saver, this is shown as a thin rectangle that disappears right into a thicker wall section.
Getting a handle on these common blueprint symbols is a massive step in learning how to read architectural blueprints correctly. With over 500 universal icons in use, understanding this visual language can cut down on-site mix-ups by as much as 50%.
Locating Essential Home Systems
Beyond the walls and doors, your blueprints are a roadmap for the critical systems that make a house functional: electrical, plumbing, and HVAC (Heating, Ventilation, and Air Conditioning). Each of these systems uses its own distinct set of symbols.
For a deeper dive, check out our dedicated article on common blueprint symbols. But for now, here’s a quick-reference table to get you started on the basics you'll see on almost every plan.
Key Blueprint Symbols You Must Know
Symbol Category | Symbol Example | What It Means |
|---|---|---|
Doors | A line with a quarter-circle arc (like ` | ⌒`) |
Windows | A break in a thick wall line with thin parallel lines inside (` | |
Electrical | A circle with two short parallel lines extending from it () | A standard duplex wall outlet for plugging in appliances. |
Electrical | A dollar-sign symbol () or a circle with a tail () | A light switch. The number of tails can indicate a 3-way switch. |
Plumbing | An oval shape () inside a rectangular countertop | A bathroom or kitchen sink. |
Plumbing | A circle attached to a rectangle | A toilet. |
Recognizing these symbols quickly will make your plan reviews much more productive. You'll start to see not just a room, but also how you'll live in and use it.
While this guide focuses on house plans, the fundamental skills transfer well to other areas. The principles of interpreting lines, symbols, and views are quite similar if you ever need to learn how to read manufacturing blueprints, for instance. By understanding this shared visual language, you can fluently read the story a blueprint tells, from a modern kitchen layout to the intricate systems that make a house a comfortable home.
Connecting the Dots with Different Blueprint Views
A full set of blueprints is your roadmap to a finished home, but it tells the story from several different angles. The real trick to understanding the design is learning how to flip between these views to build a complete, three-dimensional picture in your mind. It’s the closest you can get to walking through the house before a single shovelful of dirt has been moved.
Think of it like looking at a sculpture. One photo from the front won’t do it justice. You need to see it from the front, the side, and maybe from above to really get a feel for its shape and size. Blueprints are the exact same concept, just for a building.
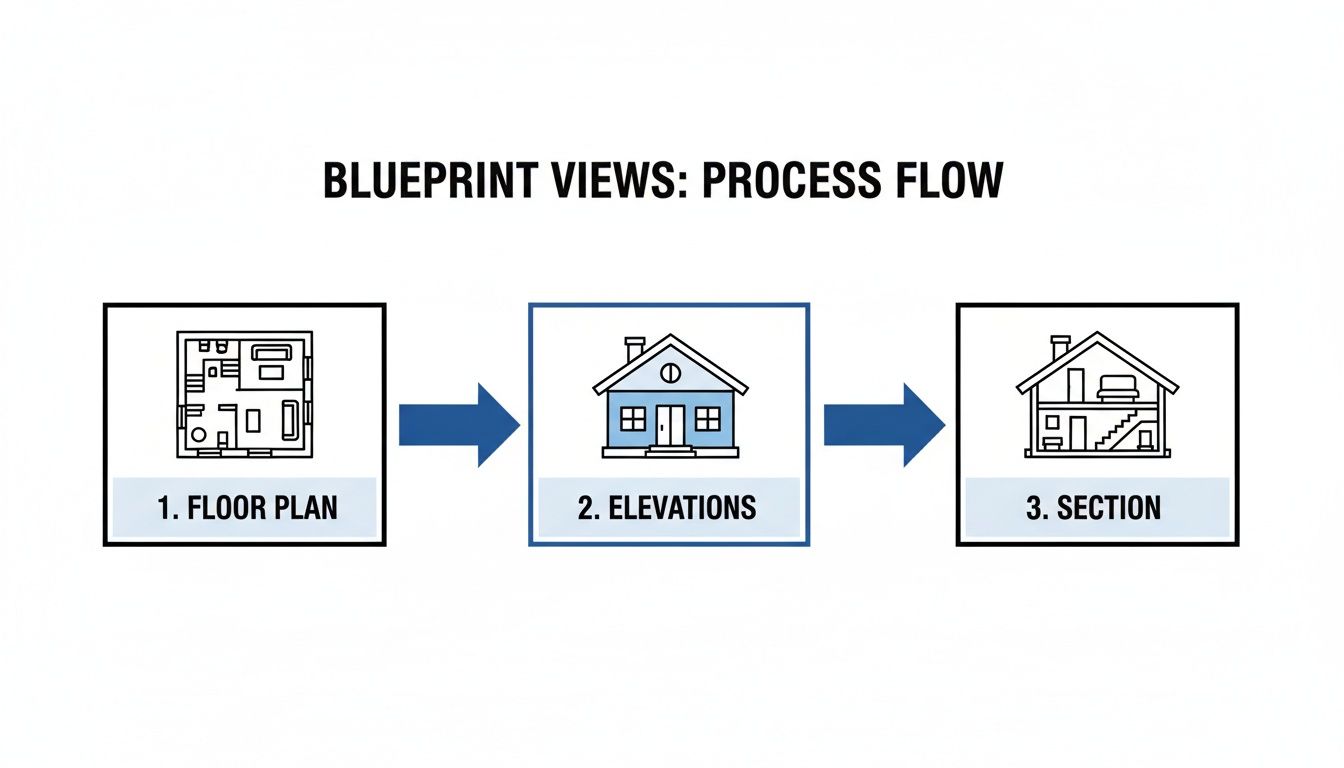
The Three Core Blueprint Views
To get fluent in reading plans, you have to get comfortable switching between the three main views. Each one adds another layer of information, and together, they paint the whole picture.
Floor Plans: This is the one most people recognize. It's a top-down, "bird's-eye" view as if the roof were lifted off. It shows you the room layout, where walls, doors, and windows are, and how you'll move through the home.
Elevations: These are the flat, straight-on exterior views of the house from each side—front, rear, left, and right. Elevations show you exactly what the home will look like from the outside, detailing materials like siding or brick, the style of the windows, and the roof pitch.
Sections: A section drawing is like taking a slice right through the house to see how all the pieces fit together. This is a critical view for understanding the actual construction, from the foundation all the way up to the roof, revealing details you can't see from any other angle.
Expert Insight: The magic happens when you stop seeing these as separate drawings. A window you see on the front elevation must line up perfectly with its location and size on the first-floor plan. Cross-referencing like this is how you ensure everything is consistent and catch potential issues early on.
Making the Connection Between Views
Let's walk through a real-world example. Say you're looking at the kitchen on the floor plan and you see a big window over the sink. To figure out what that window actually looks like, you need to find the right elevation. If the sink is on the back wall of the house, you'll flip to the rear elevation sheet.
There, you'll see how high the window is off the ground, its style (is it a casement, double-hung, or picture window?), and any exterior trim details. From there, you might even look for a section view that cuts through the kitchen to see exactly how that window is framed inside the wall.
This process of connecting the dots across different drawings is the fundamental skill you need. It’s what turns a bunch of flat, two-dimensional lines into a solid, understandable structure. To see how all these pages come together in a professional set, you can learn more about what complete working drawings include. Once you start linking the floor plan, elevations, and sections, you’ll build that complete mental picture and can review your plans with total confidence.
A Practical Walkthrough of a Real Home Plan
Theory is one thing, but really getting the hang of reading blueprints happens when you roll up your sleeves and dive into a real plan set. Let’s put everything we've talked about into practice. We'll walk through a sample home plan just like a builder would, connecting the dots between the different pages and details.
Imagine you’ve got a full set of plans from RBA Home Plans spread out in front of you. The very first thing you do is get your bearings. Look for the title block on sheet A-1 (the cover page) and verify the project name, scale, and latest revision date. This simple first step saves a world of headaches by ensuring you’re not working from outdated drawings.
Starting with the Floor Plan
Next, flip to the main floor plan, which is usually sheet A-2. This page is your home base for understanding the layout.
Start by just imagining yourself living in the space. Trace the path from the front door into the main living areas. Do you flow easily from the entryway to the great room and into the kitchen? Does the layout feel intuitive, or are there awkward corners and tight squeezes?
As you move through the plan in your mind, let your eyes catch the specific symbols we discussed.
Check the door swings. Does the pantry door block a main walkway when it's open?
Find the electrical symbols. Are there enough outlets in the primary bedroom for your needs? Is the main light switch in a logical spot right as you walk in?
Pinpoint the plumbing fixtures—sinks, tubs, toilets. This instantly helps you visualize the kitchen and bathroom layouts and functions.
Pro Tip: I always tell my clients to grab a couple of highlighters. Use yellow to trace the main paths you'd walk every day. Use another color, like blue, to highlight the sightlines from key spots like the kitchen sink or the sofa. This makes it incredibly easy to see how the home lives and breathes before a single nail is hammered.
This process of moving from the big picture to the small details is how the pros do it.
You start with a bird's-eye view of the floor plan, then reference the elevations to see the exterior, and finally zoom into the sections to understand how it’s all put together.
Cross-Referencing with Elevations and Sections
Now it's time to connect the dots between the different sheets.
Let's say you see a big window marked on the rear wall of the great room on your floor plan. To find out what that window really looks like, you’ll flip to the Rear Elevation sheet (often A-3 or A-4). That drawing will show you the window's exact height, its style (casement, double-hung, etc.), and all the exterior trim details. It’s no longer just a rectangle on a page; it’s a key feature of your home's facade.
What if you're curious about a specific feature, like the fireplace? On the floor plan, you'll find a callout symbol pointing to it—it usually looks like a circle with a number inside. That number is your guide. You'll hunt for that same symbol on another page, often a Section or Detail sheet, which will show you a magnified, sliced-through view of how that fireplace is framed and constructed.
This constant flipping back and forth—cross-referencing—is the single most important skill in learning how to read architectural blueprints. You’re always linking the 2D floor plan to the exterior elevations and the detailed section views. By following these callouts and matching up the symbols, you start to build a complete, three-dimensional picture of your home in your mind. The stack of papers transforms into a coherent vision.
Got Questions About Your Blueprints? We Have Answers.
Even after you get the hang of the basics, a few specific questions always seem to pop up. Moving from a drawing on a page to a three-dimensional home is a huge leap, and it's only natural to have some practical concerns. Let's tackle some of the most common questions we hear from clients just like you.
What’s the Biggest Mistake People Make When Reading Plans?
Hands down, the most common—and most expensive—mistake is failing to check the revision block and date. A set of house plans can go through several rounds of updates. Working from an outdated version is a recipe for disaster and can lead to major construction errors.
Before you do anything else, confirm you have the latest set of plans. This is rule number one.
Another frequent oversight is simply ignoring the scale. It's so easy to eyeball a room on paper and think you have a handle on the size, but this is almost always misleading. The only way to truly understand the space is to get out an architectural ruler and measure it for yourself.
How Do I Make Sense of All the Different Sheets?
A full set of blueprints can look like a phone book, but there's a clear logic to it. Your roadmap is the cover sheet, which always has an index listing every single drawing in the set. Each sheet is then coded with a letter and number to tell you exactly what you're looking at.
Think of it like this:
A-sheets are for Architecture: here you'll find floor plans, elevations, and sections.
S-sheets are for Structure: All the details for the foundation and framing live here.
M-sheets are for Mechanical: Think HVAC systems—heating, ventilation, and air conditioning.
E-sheets are for Electrical: This covers all your outlets, light fixtures, and switches.
P-sheets are for Plumbing: Look here for pipes, drains, and fixture locations.
Always start with the index on the cover sheet. It gives you the lay of the land before you dive into the nitty-gritty of a specific drawing.
When in doubt, ask. If you see a symbol you don't recognize or a note that seems confusing, don't just guess. Your builder is your best resource, but if you're using one of our stock plans, our team is here to help clarify the design. A simple question upfront can prevent a major headache down the road.
You might also come across other specialized documents, like the planning permission drawings required by local authorities to approve your project.
Can I Actually Make Changes to a Stock Plan?
Of course! That's one of the best parts of the process. Digging into the blueprints is the perfect time to spot opportunities to make the house truly yours. Most plan providers, including us at RBA Home Plans, are happy to help you modify a stock plan.
Once you’ve walked through the design in your mind, just reach out to us with your ideas. It's incredibly common to move a non-load-bearing wall, add a window for more morning sun, or totally rethink the kitchen layout. Our designers can then revise the blueprints to reflect your vision before a single nail is hammered.
This is how a great house plan becomes your perfect dream home.
Ready to find a plan that speaks to you? At RBA Home Plans, we offer a huge catalog of construction-ready blueprints designed to bring your vision to life. Explore our collection and start your home-building journey today at https://rbahomeplans.com.